Nick returned to the school before the arrival of the recent typhoon in the Taiwan area, so last week's classes returned to normal. However, the latest Chinese holiday, National Week, began on Sunday and has once again caused significant changes in the schedule. Most of which is due to the break mandated by the public schools. Last Sunday's classes were cancelled and the teachers were divided to work half days. I was originally slated to work a 2 to 7pm shift, but I volunteered to come in early so as to show James, our newest American teacher, which bus stop to walk to and which bus to take to get to Yopindao. I spent the shift wrestling with Maya on my computer, as I continue to struggle with making it do what I want. (See the latter section of this post...)
On Tuesday I went to the Bookworm of course. I find that after I eat breakfast, I tend to stick around and work there as well, occasionally striking up conversation or saying hello to the teachers when they drop by. More often than not, I wind up there til mid-afternoon. Afterwards I returned home and got cleaned up for an evening out with Ella and Emma. I had dinner at Pete's Tex Mex with Ella, and joined Emma and a few of their friends at a bar near the Underground.
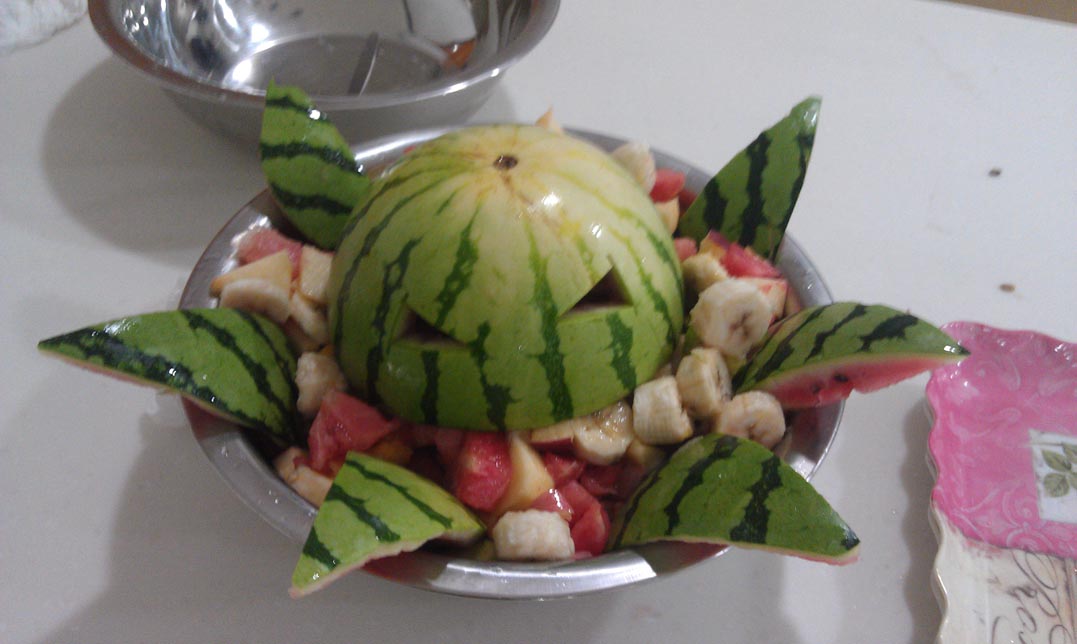
The area is truly brilliant at night with all the neon signs and the massive restaurant spanning the river on a lit up bridge. Moreover the bars are an interesting blend of Chinese and Western culture, with traditionally architecture juxtaposed with TV screens playing American music videos and many American top 40 tracks playing over the speakers. Ell and Emma's friends speak less English than I speak Chinese, but we had a pleasant evening nonetheless. Here are a few pictures.
On Tuesday I went to the Bookworm of course. I find that after I eat breakfast, I tend to stick around and work there as well, occasionally striking up conversation or saying hello to the teachers when they drop by. More often than not, I wind up there til mid-afternoon. Afterwards I returned home and got cleaned up for an evening out with Ella and Emma. I had dinner at Pete's Tex Mex with Ella, and joined Emma and a few of their friends at a bar near the Underground.
The area is truly brilliant at night with all the neon signs and the massive restaurant spanning the river on a lit up bridge. Moreover the bars are an interesting blend of Chinese and Western culture, with traditionally architecture juxtaposed with TV screens playing American music videos and many American top 40 tracks playing over the speakers. Ell and Emma's friends speak less English than I speak Chinese, but we had a pleasant evening nonetheless. Here are a few pictures.
The schedule has been drastically altered this week during the continuation of the National Week break. Monday's classes ran normally, but today's classes were cancelled. In their place we ran all of our Saturday classes. Tomorrow I'm off of course, and Friday's classes will be held as usual. On Saturday, we have another in-office day where our only priority will be to do any OPTs that come up. And on Sunday the staff from each school will all be attending another team building event, which is rumored to include food and laser-tag. I will of course take pictures and post them afterwards.
Second Life Update:
I found the process for making avatars with sculpted primitives very easy, despite the limitations imposed by the ability to deform the base (human) mesh. Making a creature larger than a human required two alternate workarounds. One could cheat the proportions with physical additions to the base character, i.e. a large forearm with a static hand that pivots at the base model's wrist joint rather than the elbow. A practical technique used by James Cameron and Stan Winston to articulate the life-sized Queen Alien in 'Aliens'. Or someone could use a third party program to create an animation that deforms the base model by moving the locations of the various joints beyond their set limits. (A technique I never learned.) With a bit of creative problem solving however I was able to make several interesting, non-humanoid creatures.
Now we come to polygon mesh modeling, which is very different.
A sculpted primitive model is made from many individual pieces (primitives), each sculpted and attached just so to the base model to appear as though it were a solid object. Therefore, a complicated shape, a creature's head for example, might be made up of dozens on individually sculpted elements.
A polygon mesh model is exactly what it sounds like. It is a single unified object. It's shapes and contours are dependent on the position of thousands of vertices connecting the entire grid of polygons together. It too can be made up of multiple objects, the teeth, for example are a separate element, grouped together.
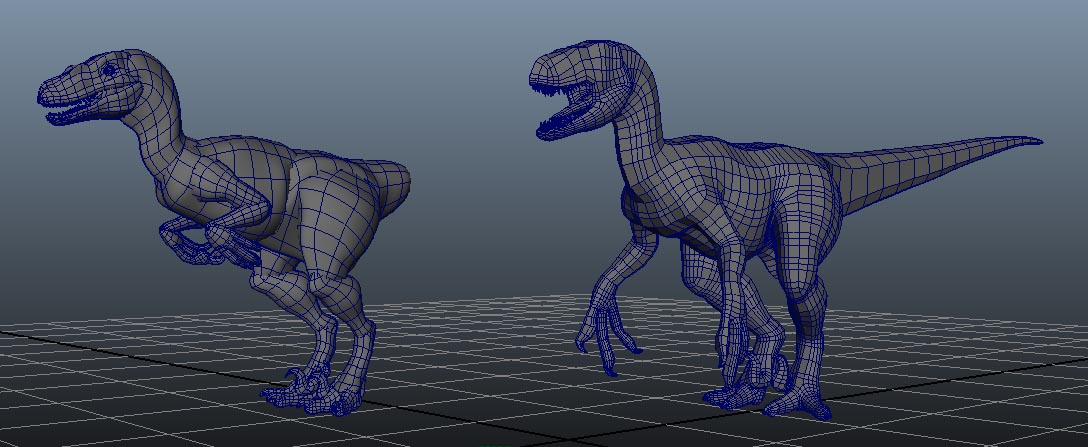
A sculpted primitive model (left) and polygon model (right)
The sculpting process in Zbrush is much more intuitive than Maya and the degree of freedom and ease of creation allow for a much more detailed model to be produced in far less time. The first hurdle was determining a process of reducing the physical detail of the mesh itself, (the concentration of polygons on the grid) while preserving the appearance of the fine details that had been sculpted on the high density model. Zbrush allows an artist to manipulate millions of polygons in a fluid manner that is strikingly similar to working with traditional sculpting mediums.
The next step for creating a polygon mesh model is to lay out UV coordinates. The UVs themselves are basically all the pieces of the model cut apart, like one would do with fabric, and laid out in a two dimensional image so that a texture can be painted on them. This texture represents the detailed images applied to surface of the model to give it it's final appearance. Thankfully Zbrush makes this process much more painless than Maya, albeit not as optimized. On a standard UV map for a video game, the head would be much larger to maximize the amount of detail. But the resulting UVs are easy to read and perfectly usable for the project at hand.
The next step for creating a polygon mesh model is to lay out UV coordinates. The UVs themselves are basically all the pieces of the model cut apart, like one would do with fabric, and laid out in a two dimensional image so that a texture can be painted on them. This texture represents the detailed images applied to surface of the model to give it it's final appearance. Thankfully Zbrush makes this process much more painless than Maya, albeit not as optimized. On a standard UV map for a video game, the head would be much larger to maximize the amount of detail. But the resulting UVs are easy to read and perfectly usable for the project at hand.
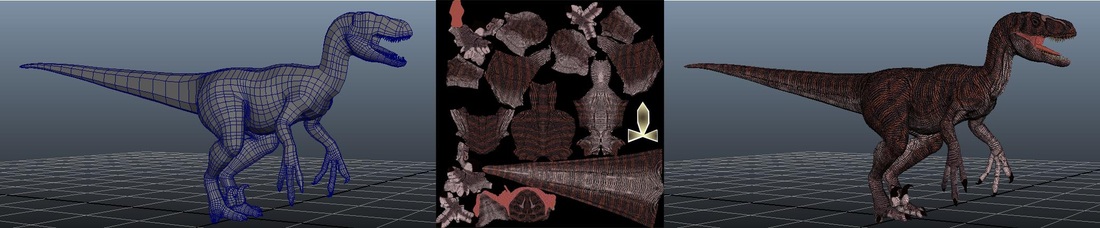
The base model (left), the UV texture map (center) and the detailed model (right)
The next part of the process is to "rig" the mesh onto a skeleton. For any other in-game animation for any other program a complete custom skeleton would be created, giving the artist freedom to map every digit or say, the tail in this case. However, due to the current limitations in Second Life, a mesh avatar much be animated off the default skeleton, which does not allow for additional bones.
The joints of the default skeleton are re-positioned to the approximate corresponding parts of the model. The skin of the mesh must then be bound to the skeleton, and the parts further adjusted by a process called weight-painting. Weight painting provides a grey scale gradient delineating which areas will affected when a particular joint is reoriented.
The joints of the default skeleton are re-positioned to the approximate corresponding parts of the model. The skin of the mesh must then be bound to the skeleton, and the parts further adjusted by a process called weight-painting. Weight painting provides a grey scale gradient delineating which areas will affected when a particular joint is reoriented.
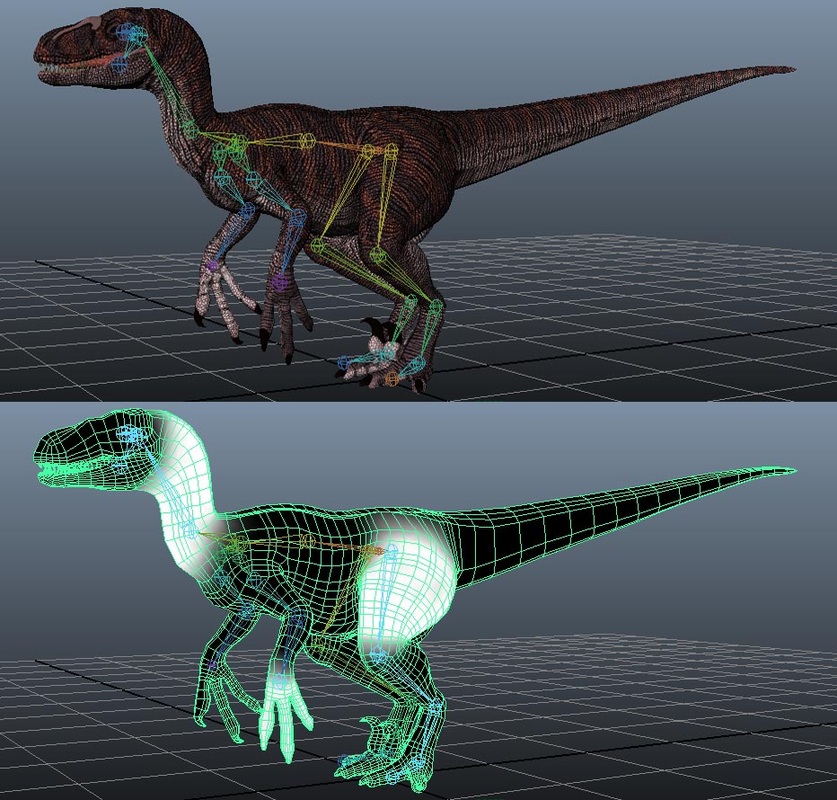
The skeleton aligned to the model (top) The weight-painted areas of the neck, left wrist, and left hip respectively (bottom)
Once this has been done, the model can be freely posed by reorienting the various joints.
http://fc03.deviantart.net/fs70/f/2013/264/9/f/utahraptor_turnaround_by_art_minion_andrew0-d6nal5o.gif
The model can also be animated by creating key frames on a timeline, representing the most extreme changes is the model's position. The computer calculates the necessary motions in between to give the animation a smooth transition between poses.
http://fc03.deviantart.net/fs71/f/2013/268/d/9/utahraptor_idle_animation_by_art_minion_andrew0-d6nt7zn.gif
The major issue has been transferring this rigged model to Second Life so it can be finalized for sale. If I export the model directly from Maya and wear it in Second Life, the size of the model blows up so large that it either disappears completely or I am forced to the 0,0,0 coordinates of the sim (game environment).
If I transfer the file to Blender, a separate modeling program, and re-export it from that program I can wear the mesh in Second Life but it is deformed beyond recognition.
Once I can determine the cause of this issue I will have to address the trouble I've had uploading animations from Maya into Second Life. The entire process has become incredibly frustrating. Thankfully there are those on the Second life forums with more experience who have been giving me advice on how to solve my problems So I may yet succeed. I'm quickly reaching the point where persistence in this project borders on masochism.


 RSS Feed